Showing posts with label the velo shed. Show all posts

Monday, February 10, 2014

What is a digger?

 Before we talk about diggers, you may have noticed the name change. Another day in the bike shop was the name of my old blog. It came from the oft asked question, "What is going on"? I like it a lot. And a lot goes on in a bike shop besides selling and repairing bikes. Sometimes I want to talk about that stuff and that did not feel right under TheVeloShed( and I found another guy already using that name). Can you dig it?
     Right  around the corner from VeloShed Enterprises is the Kirby Derby and every year we talk about building a gravity racer for the Derby and every year we go for numerous bike rides instead. Well, thanks to the wonderful weather we have been having, this year gravity racing is a go-go. It also helps that we have our own little Dead Mans curve in the funness that is the section of House Creek trail between Meredith and Horton. A gravity racing test facility, right across the street.
     First thing you do, when you want to build up a rig, is go on the web and look at about a thousand pictures, hoping for a little inspiration. My initial plan was to build something fast with adjustable steering geometry for corner tuning, big disk brakes, smooth body work, deluxe interior. Then I saw this:
Out Law derby car made from a wheelbarrow.

 This was built by a guy that goes by Kenny P. on the H.A.M.B. forums. Scratch that high tech race rig. Lets build a rat rod! 
     First to put the word out for a wheelbarrow, Chuck is on a tight budget, don't you know. Then to dig around in the shed for some appropriate bicycle wheels(This is a bike blog, more or less). Finally off to work where I doodled frames and steering linkages until I got a response on a wheel barrow. Finally, I got the message. She was a little rusty(OK, really rusty) and in Hillsborough, but free is free. Thanks to Bob for that, and the project is underway. 
    
If you flip them on their back, they can't get away.


The second original plan, after tossing the original original plan was to paint this one up real nice, more a fifties look than a rat. But look at the patina on this tub. It is going to have to be rat all the way.
     Of course I had to continue looking at pics on the web for ideas and this led to looking at lots of diggers. What is a digger? It is a front engine dragster, the driver sits at the very back. They are also called slingshots and rails and had a reputation for grenading the clutch and chopping your legs off. This was the look I wanted. Also wheelbarrow,...digger, they go together.
Zorba's Ghost
A little(very little) bit of mock up. 20" skinnies in the front and 24" with 3" rubber in the rear.


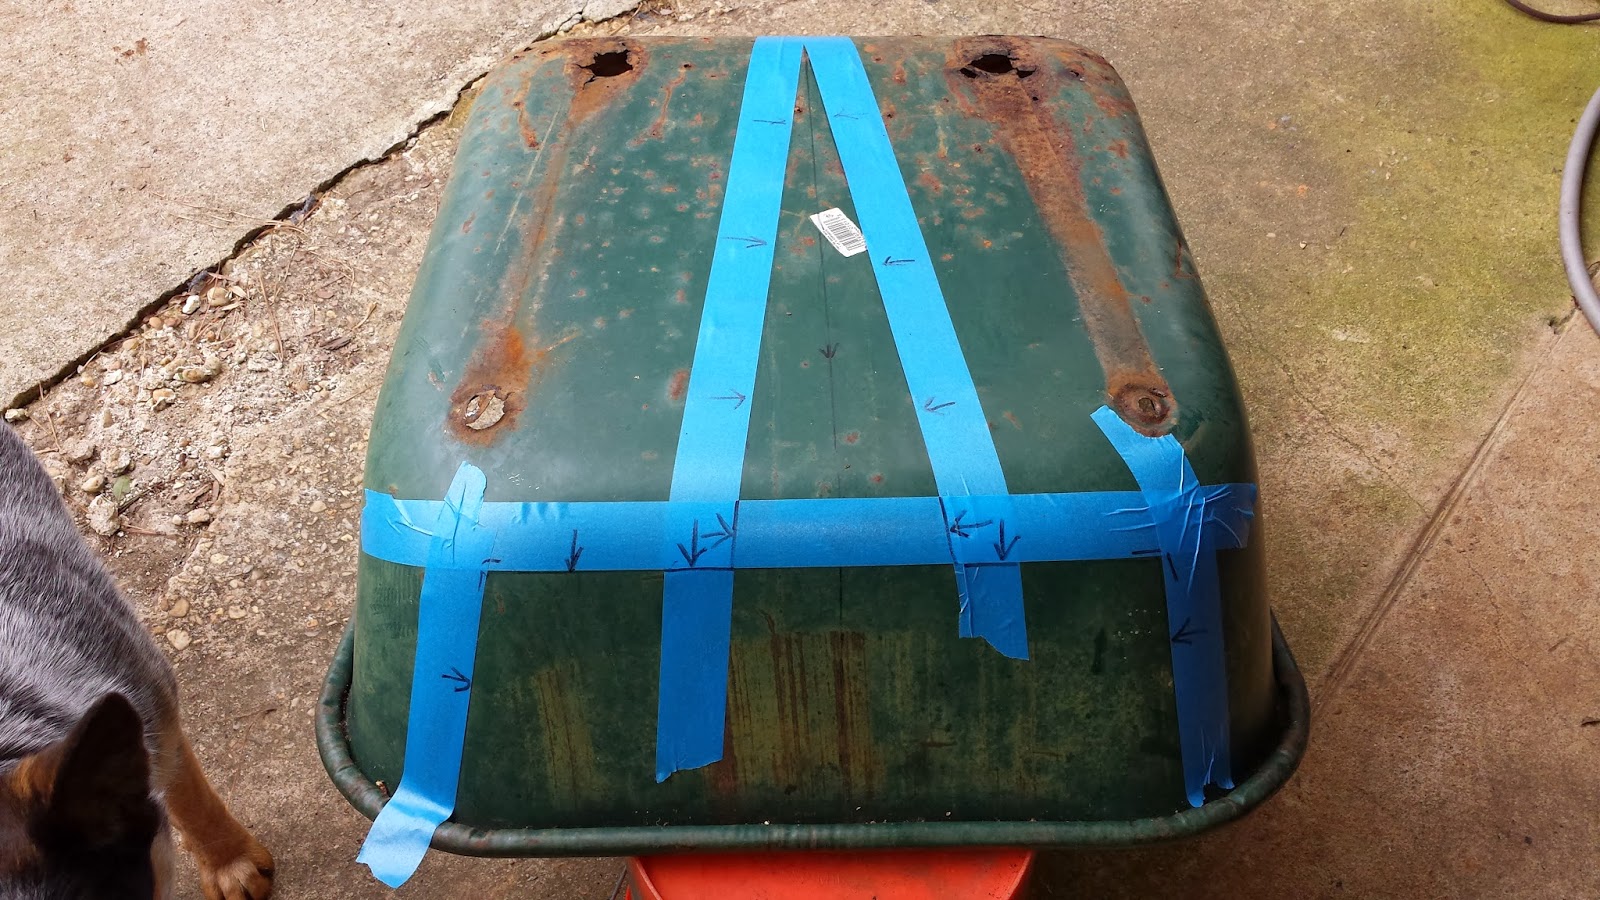
 The tub is a little wide for this look and actually gets wider at the front (the front as I am building it). Need to narrow that baby up. Here is how that went:


Un-molested
Cut lines taped, the arrows are so you cut the correct side(Not that I have ever screwed that up)
All trimmed out
 

Bent and welded together, lip rolled.
    
There you have it. This took four inches out of the front and made it three inches narrower than the rear of the tub. The opening is pretty narrow but the look is just right. I also found, while welding the seam, that this is a little rustier than it first appeared. I was going to cut and fill the rusted out areas but there is not much to work with so some 1/2" plywood will be used for an inner base to take the load of the operator(idiot driving).
Idiot
Next time, assuming I can find something to carry 10 foot sections of pipe with, we will be laying out and welding up the frame

Thursday, January 16, 2014

Testing the improvised presta adapter.

     By now everyone has seen the make shift presta adapter video on YouTube. If not Here it is. It looks like a good trick, but I needed to check it out and see how well it works.
     First is the obvious downside that you need to have a knife handy, or really strong teeth. It would be easier to leave an adaptor in your bikes seat bag. Another trick is to leave the adaptor on the valve stem in place of a cap.
I like to turn them up side down after I have inflated the tire, that way I know the valve has been screwed closed.
     On with the experiment. Using a box cutter I sliced thru the valve cap right where the knurling ends. The video is not real clear about how the remaining piece is installed. I tried installing it the normal direction.

This left the cap very loose and it was easy to screw it down to far and expose to much of the valve head(Like in the picture above) You could not use a air chuck with the valve protruding this much.
    Getting the cap level with the valve head allowed me to pump the tire with compressed air but there was a lot of leakage. It would be OK for the gas station quick fix.
     Next I tried installing the cap reversed. It was a little tougher to get started but that turned out to be fine because the seal between the cap and valve was much better.

Again you want to screw down the cap until the valve is just flush with the  top of the cap. Using an air chuck and compressor worked great, no leakage. Then I tried the real test, a hand pump. It worked! I as a little surprised that the seal was good enough but I was able to get around 100psi before the pump started having trouble gripping the cap and popped off. This is a solid work around if you need to get a presta tube up and only have a schrader chuck available.

Life time supply of presta adapters.

Friday, January 3, 2014

Balloon Car Gran Prix

     Some times you need to have a little fun. At the shop we decided a balloon car showdown was the way to go. The idea started when some balloon powered cars were spotted at the Porsche exhibit. They looked like fun but we all new more fun was to be  had in doing our own build off.
     The rules were simple. Each competitor would get a Pepsi can, bendy soda straw, sheet of construction paper, balloon, and a roll of tape. They could assemble the car in any fashion as long as only the supplied items were used. Prototyping was allowed and you could use as many materials as needed but only one of each in the final build.
     The winner would receive our coveted Specialized Christmas water bottle(Yes, they only sent one for the shop to share)
The builds were all kept secret until race night. Each build was unique.
Danielle

Brendan

Chuck

     The race rules were set at three runs with the greatest distance winning. The three run rule was immediately tossed out the window when all cars experienced technical problems. It was decided, on the spot, to mod and run until everyone passed out from repeatedly blowing up the balloons.
     After an hour and two nearly thirty foot runs, congratulations and awards were handed out.
 
     And the winners, Danielle with 1st, Brendan 2nd(by mere inches), and Chuck a distant third.


     Fun was had by all, it was better than team building and no one had to catch anyone.

Monday, December 23, 2013

Schrader time

     Everyone uses schrader valves. Yes, everyone. I know you are thinking you would never have a bike with schrader valves, you are presta all the way. But, your suspension shock and fork use them. Your car has them at all four corners, one for the fuel injection, and two on the AC system(Your home HVAC has them as well) There is even one on your water supply if you have a well.
     They are everywhere and with good reason. The schrader valve is a spring loaded poppet valve that makes it very easy to get a measured amount of gas in or out of a system. It was patented by August Schrader(most likely developed by his son George) in 1891.
     It would take another five years to develop the schrader valve cap. That's right, plastic cap, five years of R&D. Remember that next time you have trouble coming up with a plan of action.
     We have the schrader valve thanks to the bicycle. When August saw the popularity of pneumatic tires coming out of Europe he saw a need for a tire valve. Which is a little odd, because they already had a valve, other wise they would have been flat tires coming out of Europe. That valve was the presta. I have not found much on the history of the presta valve except that it seems to have been appropriated from the steam industry.
     The schrader valve has some advantages over the presta valve. They are serviceable, the core can be removed and cleaned or replaced(Some presta valves have a removable core). The valve is spring loaded and does not require pressure behind it to stay closed. Because the valve is spring loaded and the air chucks and gauges have a fitting the depresses the poppet, you can get a more accurate reading of pressure.
     A disadvantage is the hole required is slightly larger than for a presta valve. If you have a very narrow rim strength could be compromised. I feel this may have been an issue a hundred years ago when rims were made of wood or rolled from steel sheet. I have never seen a rim fail at the valve hole(Where it was not run over by a truck or tossed off a mountain side)
    You should use the valve cap. It took five years to develop, there must be some crazy technology in there somewhere. The practical reason is that it keeps crud out of the valve. If you have a little dirt in the top of the valve and then pump up the tire, some of that crud is going thru the valve and some of it might get trapped between the poppet and seat, creating a leak. You can remove the core and clean out this area but it is simpler to just keep it clean.
      The valve caps should be considered part of your suspension. The schrader valve is great for holding pressure but a rear shock at full compression can experience a spike over 3000psi. The beefy cap with its built in seal keeps that in the shock. If you lose a cap, stick a plastic one on to keep the valve clean, but replace that with a proper sealing cap as soon as possible.
     I am not going to go in to tire pressure here, that is a whole other post, but if you are concerned about your pressure, be sure to use a quality gauge(not a stick gauge). Digital gauges work best and are the most consistent, but a good dial gauge can give a decent reading. Be sure to use the same dial gauge each time so the readings will be consistent(There can be a big difference from gauge to gauge)
From my collection(of junk). Made in 1922, still works.

Monday, December 16, 2013

Pro tip, Cyanoacrylate

    
Crazy Glue, Super Glue, Quick Set, Super Bonder, Eastman 910. Cyanoacrylate is great stuff by any name. It was originally discovered when trying to develop a clear bombsite during World War II(1942). It stuck everything to everything else. Scientists at the time decided this was a useless feature and discarded it. Rediscovered in 1951 by two Eastman Kodak(There used to be this stuff called film. You would put it in a camera, take pictures with it, then pay some guy in a drugstore ten bucks to develop the film so you could see how terrible they were). These guys, Harry Coover and Fred Joyner, realized that people did, in fact, like to stick many things together. So in 1958(It took seven years?) Eastman started selling Eastman 910.
   Cyanoacrylate reacts, and sets, to the presence of water in the air(Pretty cool). That is why you need to put it on thin, so it can all react. This is also why a bottle of it becomes unusable about ten minutes after you open it. When applied to cotton, it can have an exothermic reaction producing enough heat to catch fire(Also pretty cool). Acetone will loosen cyanoacrylate as will a couple of other chemicals that sound like they may cause instant cancer.
     Cyanoacrylate is used for building models, fletching arrows, capturing latent fingerprints, and putting on fake fingernails. Guitarists use it to make their fingertips tougher. During the Vietnam war, a spray on version was used to close wounds and reduce bleeding until soldiers could be evacuated to a medical facility. It is used in place of stitches with reduced incidence of infection. It is used by college students to glue their sleeping room mates hand to his weiner, creating hilarity(Don't do this).
     In the shop, I use cyanoacrylate for a couple of things. Gluing little broken bits back together of course. And it works great if I slice open a finger or rip back a cuticle, just glue it closed and keep on working. Way better than a band-aid.
     But my favorite use for cyanoacrylate is gluing the wires of a cable end together. Sometimes after installing and cutting a cable you need to pull it back out. Getting it out is pretty easy, pushing a cut cable back thru the housing without it fraying can be tough. And some cables are pretty pricy, so you don't want to just replace them(And eat the cost) after trimming to soon. With the cyanoacrylate you can clean the cable end with solvent, apply the glue wait a few minutes and then easily remove and reinstall the cable. Even with a twisty routing the cable will stay un-frayed.
     You can also solder the cable end. This used to be a popular pro move and I still do it if someone wants me to. The problem I have found with soldering is that it makes the last half inch of the cable rigid. With modern routing, especially in frame, this can keep you from getting the cable back thru the housing and makes it near impossible to route thru a shifter.
     Go get a bottle of this magical stuff and glue a quarter to the floor in a high traffic area, it is good for hours of entertainment.
    

Thursday, December 12, 2013

My bike was making a rubbing sound....

.... but it went away.


     What a great photo. Imagine how long this took. The conditions would have to be ideal. No lube, a little bit of dirt to provide some abrasive, a broken shift cable, a limit screw just enough out of adjustment that the chain did not just drop to the small ring(Think about that. The low screw was tight enough to keep the chain off the small ring but slack enough for it to rub constantly), a very tolerant rider that could handle the constant racket without checking to see what it was.
     I am not putting this up to give the guy, that brought the bike in(For another issue), a hard time. No person is an expert on every subject, and the bike still moved when pedaled, and that was all it needed to do.
     This is really an issue of gradual change. We all experience change but sometimes it sneaks up on us(Where the hell did all that grey hair come from? Wait, where the hell did all that hair go?) If your bike has a mechanical brake system, think about change, then go check them. They can stand to be adjusted, can't they? The braking material comes off so slowly that we don't notice the lever coming in further and further. Then suddenly they don't work at all. That is how we look at any kind of failure, it happened suddenly. When really it has been in the process of happening for weeks, months or years. Happens with drivetrains to. It seems like one day it is working fine and then the next it is skipping and jumping. What really happens is, from the first pedal stroke, all of those bits are rubbing against one another and wearing out. Then after thousands of miles, one tooth on one cog is worn to the point it no longer can place the chain. Suddenly your bike skips. And I know you are thinking that there are a bunch of teeth to take the load, but almost all the load is taken by one tooth and roller on each gear. On a new drive train it will be the tooth at the top of each gear on the loaded side(More about this another time)
     When a frame fails suddenly, it is usually the result of months of propagation. You might have a flaw from manufacturing. That flaw could be a poor end cut on a tube or impurity in the steel.
     Some of you remember  the spoke fiasco of the mid 2000s, where hundreds of wheels just failed(suddenly), sometimes on brand new bikes sitting in the showroom. This was caused by impurity in the stainless steel spokes. The stainless had a mix of slag and ferrous steel in it and every spot of impurity was a stress riser. The spokes worked fine as long as you left them in a box, but as soon as you laced them in a wheel and put tension on them, a crack would propagate from the impurity and suddenly taco'd wheel.
     You can have a failure from a dent caused in a crash you barely remember(Meaning the kind of crash that was no big deal, not the kind where you are knocked out)


Ignore the crack and look at the dent. It does not look to bad, just a soft smoosh.(The customer hit a tree and managed to whack the bottom of the down tube against it.) This eventually went nearly all the way around the tube. That comes back to the sudden failure. The accident happened about two months before the bike came in. But it suddenly broke.

     This is the inside of that same tube. You can see that what looked like a soft dent, created a spider web radiating in three directions. That was the failure, it just took a while for it to get big enough to notice(and I had to cut the frame apart).
     Next time something just...breaks, think back thru the time line. Look for those cues to wear and fatigue. That is how you learn to spot problems before they turn your ride in to a hike.


Saturday, December 7, 2013

Tool Review: Drillin' Time

     Time for a little tool review. It is not about a new pin spanner or freewheel tool, this is about a drill. Surely, one does not use a drill on a bicycle you say. But I surely do.
     A drill comes in handy for lots of jobs. You can chuck a dingleberry hone(Yes, it is actually called that) on and get all the corrosion out of an old seat tube.
I'll be your dingleberry.

Drill out(another) damaged rivnut. Drill out a mangled dropout to fit a threaded sleeve. Drill a hole in a piece of wood so you can tap the brake pivot out of a Campy shifter(In order to get at the front gear carrier bolt, in order to remove the rear bolt, in order to put in, yet another, pair of G-springs)
Photo of rare, unbroken, G-Spring

     Rotor bolts, man is a drill great for rotor bolts. You have to Loctite them on, so they never just want to spin out, and when you put new bolts in they come pre gummed and you have to fight that stuff all the way down. (You do want to break them loose by hand and torque them to finish).
     You might even want to go old school and drill a thousand hoes in your bike to make it two ounces lighter(People actually do this)

Once owned by a guy with lots of free time
    
So everyone should run out and get a drill. The one to get? The Milwaukee 2407-22.

My awesome drill
 This thing is great. A real 3/8th chuck instead of a 5/16th socket fitting. The chuck is the hand tightening style so you don't have to keep track of a key and bit changes are quicker. The drill is gear driven so you can get the chuck good and tight against the gear(It locks up when static) The gear drive is two speed and the drill is variable speed so you can ease in before dropping the hammer. It has an adjustable clutch that can be set so low it will stall going in to drywall or be locked out for drilling. There is a set of LEDs that act as a fuel guage so you can tell when you are running low and the batteries are lithium ion, light, powerful, they and hold a charge forever. Comes with two batteries and a smart charger that will keep your spare perpetually topped off.
So tiny, yet so powerful.(Not the hand)

     When you pick it up, this baby feels so light you'll think it's a toy, but it will put out over 250 inch pounds of torque and really surprise you with how it powers thru just about anything in the shop.
   This drill is so great that the big boys almost never see the light of day anymore.
Sad drills that have been put to pasture.

 This is a hot tip for Christmas(I was not paid by Santa or Milwaukee for my effusive praise of this wonder piece of shop kit)

Tuesday, December 3, 2013

Things Not To Do, Part 1

Don't do this.

     If you don't see the problem, someone else probably takes your wheels off for you.
     If you do this someone else should take your wheels off for you.
     It is great that that tube(the chain or seat stay) is right there for you to grab and lever down the  QR. You know, get it really good and tight up against the stay. But when the time comes to get the wheel off, where do you put your fingers? See? The gap between the QR and the tube is about a 1/4 inch. Not much to work with. If it is tight enough you will need a screwdriver to lever it open.
     In our shop I have a special tool I made called the Mongoose tool. I made it by pulling the seat post out of an old Mongoose we were tossing. It has a perfect lip(The kind only cheap steel seat posts have) for grabbing the end of a QR lever and prying open without damaging the paint like you might trying to pry the lever loose with a screwdriver.
    The other issue is that when you are flat, on the side of a treeless road in July, with no screwdriver and no Mongoose tool, you don't need to add to your hassles by struggling to get the wheel off the bike. That is supposed to be the easy part of a flat repair. Save the struggling for getting that Continental tire off, and then back on, that old Matrix rim(Some of you know what I am talking about, good times)
     Just angle them slightly off the stays(or fork legs). You can still use the stay to tighten and you can get your fingers behind the lever when you need to. If you are really paranoid, you can point them aft so they don't get caught in your teammates(or random little old ladies) spokes.

Monday, November 25, 2013

Embrocation. Do you want to be an Icy Hot Stunta?

You can't have embrocation without bros


     Embrocation, that is a hot(see, because it feels hot) new thing. Let's take a look at it, shall we? The word comes from the Greek embrokhÄ“, meaning lotion. Then, in medieval Latin, embrocare, meaning to rub in lotion. Currently, embrocation means both the lotion and and the application of. So the Greeks and Romans, with obvious help from ancient aliens, knew we were going to want to rub lotion on ourselves while freezing our asses off, getting a solid seventeenth, racing around a cow pasture.
     You can't talk about embrocation without talking about liniment(Latin, linere, to anoint).
Soothes hands, side effects include ridiculous mustache
Liniment is used to soothe sore muscles and is rubbed in to the skin, massaging said muscles. So generally you are going to use this post-workout. Liniment is primarily alcohol(or other evaporative) so it evaporates quickly, cooling the skin. It may also contain, wintergreen, for more cooling, or capsaicin (chili pepper goodness) to provide a warming effect.
     Embrocation is also used to soothe muscles and  is massaged in to your flesh, but you put it on pre-ride. Embrocation can use as a primary ingredient, plant oils and fats or petroleum jelly, basically moisturizer. Like liniment it will have capsaicin to provide a warming effect.
     Did you know embrocation was used, in the Victorian era, to treat cholera? They also used cupping which is where you make a small cut in the patient and then apply a vacuum to the site to remove bad humors. Both  methods had similar results.
    So are we getting any real benefit? The big claim is that embrocation keeps you warm and we will get to that in a minute. First, recommended application is to rub it thoroughly in to your muscles(legs, glutes, lower back. DO NOT APPLY TO WANG REGION). This is a good thing. Cold morning, muscles are stiff and cool, rubbing them will help warm and loosen them, preparing them for activity. Second, there is a lot of moisturizer in embrocation, this is good for cold and/or wet days. It will keep your skin from drying out, reduce chafing, provide protection from the wet, and ensures your knickers are gross enough you will not be tempted to use them again without washing them. Third, the HEAT. With capsaicin rubbed on, you are going to get that burning sensation. What is happening?
     Capsaicin(also capsicin, capsicum, cayenne) is an active component of chili peppers. It is an irritant to mammals(But not birds, interesting), causing a burning sensation on exposure, especially to mucus membranes(eyes, mouth). It is also hydrophobic, this is why drinking water did you no good after you ate that habanero on a bet. The burning sensation is caused because capsaicin activates a nerve channel that transmits pain or heat notifications. It is usually opened when a temp over 37c(that is body temp) is applied, to let us know that the burner is still on. But when capsaicin is applied it will trigger the nerve well below body temp.
     So there it is, the embrocation is not making your legs warmer. It is faking out your brain, making it believe you are by the fireside, when you are, in fact, struggling on the run up.
     A couple of other interesting tidbits.
     If you use capsaicin for an extended period, the neurotransmitters are depleted, and you get an analgesic effect.
     Capsaicin is a banned substance in horse racing. If you were a horse you would be doping right now.

      Embrocation is something all the cool kids are doing right now. There is certainly no harm in it, and it generally does you some good. But remember, the sensation of warmth is just that a sensation, you are not actually warmer. Wear your warm gear(no shorts and sleeveless tops) and eat plenty, the furnace needs extra stoking on cold days. Drink plenty of water, so you don't dehydrate. This is tough because you are going to want to take a leak every ten minutes and that is loads of fun with bib tights on. You have to kind of arc the stream out.
     Final thought: Don't stick your finger in your eye.

Friday, November 22, 2013

Be Gentle With That Hose

     Bikes don't really like to be washed. The problem is that they do get dirty(Who's a dirty little bike?). So you need to clean them from time to time. Just get out the old hose and go to town. Works on the car, why not the bicycle?
     This is what your bike looks like when you get the hose out.
     There it was leaning against that tree in the backyard, thinking happy bike thoughts, when you come around the corner with your trusty garden hose, acting out a scene from a Filipino prison flick, maybe the Big Bird Cage.
     The problem with the hose is the pressure of the water. That pressure is jetting water and grit right in to all the little nooks and crannies that are supposed to have grease or oil in them. So even tho your steed looks new and shiny. you have laid the Hoo-Doo on it. Bearings will start rusting, pulleys squeal, the derailleur gets stuck in the big ring(That's OK because who uses those sissy little rings? Am I right?)
     You're not convinced, I can tell. So let me get out my exhibit "A".
What the hell is that!?


     This is a stanchion from a 1995 RockShox Judy. The Judy was a huge leap in the fork world. It was light and stiff, used elastomers(which have, now, all returned to the earth) for springs, and had a damper to control the action. The damper had a special feature to let you know when it needed servicing. It would pour oil all over the floor, worked great.
     The guy that owned this washed his bike after every epic weekend ride. He brought it in because the fork, "Felt funny". That was because a combination of grit, mud, and water had been forced past the seals and were trapped at the upper bushing. the constant action of the fork cut right thru the hard anodising and about 1.5 mm of aluminum.  Pretty cool.
     The customer was positive this was a warranty.  He Was Mistaken
     When you clean your bike you want to be gentle, wash it like you would one of those small dogs that looks like it is about to have a seizure. Spray on some Windex and wipe it down with a wet towel. That will get off most road(and off road) grime in just a few minutes, and leave all the slick stuff where it can do its job.
     Your bike will never get really muddy because you would never ride a trail in poor weather eroding the singletrack and screwing it up for everyone else. Right?
     I know, some big kid just pushed you in to the mud and now your bike is really dirty. If you get to the grime while it is still wet you can get it off with the wet towel method. If you let it dry, you can brush it off(sometimes). For the times when it is really stuck on and you just have get the hose, use a head with a diffuser and keep the pressure low

Just wet the bike, use a soft brush to loosen the dirt, and rinse it off. After, wipe the bike down. Run the chain thru an old towel, and re-lube every thing that moves with some wet lube.
     And just so you know, I am a reformed washaholic. Every week with a hose and a bucket of suds, my M800 got a thorough bath. Then, one day, the rear hub seized. Taking it apart I found one of the sealed cartridge bearings had gotten water in it and rusted solid. I saw the light, I realized the errors of my ways and left the flock of obsessive Felix Ungars
     Also, figuring what is good for the bike must be good for the rider, I tried not washing and just a shot of Windex once a week. Turns out that wives don't really go for that.

Tuesday, November 19, 2013

It's the little things(you do for your customer)

     Sometimes your customer has a problem, might be a little one, that they need help with. You can shrug your shoulders are figure out a solution.
     This guy wanted a bell on his bike. The mount would not work on his handlebar and he really wanted it off of the steerer anyway. I could have shown him the bell that mounts on the top cap, but he really liked this bell.
     So I took the bell apart, removed one of the headset spacers, drilled it and tapped it to fit the main screw of the bell, and added a spacer so the hammer would have enough room, put it all back together. 15 minutes to make someone happy.


      Doing this starts with two things. One, the willingness to expend a little effort to work with someone to reach their goal and making it your goal. Two, the ability to look at the solution rather than the problem. (OK, in this case, three things. You need some mechanical know-how also)
     In any small business making the customer happy is key to their returning. Since you can't do it by giving stuff away for free, you need to do it by solving the problems you can.
     And not every problem can be solved(Without throwing lots of money at it). Now it is time to explain why you cannot replace the seat post on that Peugeot  Versailles.(23.8mm, out of production for 25 years. You knew that, right?) In a case like this I will still do a little extra. Show them the catalogs, bring up a search for the seat post on the internet, recommend checking some bike co-ops, explain how to do an Ebay search, tell them to never buy another Peugeot (Just kidding, don't do that). This can alleviate some of their frustration and redirect them in a (hopefully) productive direction.
     Now to warm up for this go to the mall and hold the door for some people.

Friday, November 15, 2013

Hot tip for the SRAM red Hydro (That is the road hydraulic brake)


The SRAM hydro is a great update to braking for the cross racer. More power, muck defying, works when wet, no ear splitting fork chatter. you can even get the wheel on and off without a struggle(You canti guys know what's up).
     But there is an issue. The levers come way in, sometimes the shift lever even gets caught on the bar tape. Part of this is that when you grab the brake while bike is not moving, you get no feed back and just pull the lever down til it quits moving. On the course, they are hauling you down way before you bottom on the bar.
     The other part of this is that the levers come adjusted pretty far in. WHAT? you say. That is right, the levers can be adjusted in and out. It can be hard to tell from the pictograph SRAM supplies with the brake(If you even bothered to look at it). So I took a picture.

     You want to pull the shift lever straight back and then you can access the adjuster(That little silver screw) with a 2.5 mm Allen wrench.
     Even if you are happy with your brakes, give this a check as I have seen a couple set up uneven right out of the box.

Wednesday, November 13, 2013

Old Tool Time

     This is the Park SS-1. It is used(primarily) to straighten bent stays. You put the outer hooks on either side of the bend with the center hook centered on the bend and then you can screw the center hook in or out to push everything back in to place(more or less).

     Park does not offer this tool anymore. As steel bikes have gone the way of the thylacine and aluminum and carbon don't really like being bent, tools like this are getting very infrequent use.
    This is a thylacine or Tasmanian Tiger. They looked like dogs but were marsupials.

     I am working on a post(or posts, maybe a two parter) about hydraulic disk brakes. If you have any questions, let me know and I will incorporate them in to my post.

Sunday, November 10, 2013

Your Great Grandads derailleur, the Cambio Corsa

     The First bicycles had no gears, you just pushed along  while straddling your two wheeler. (Harley Davidson made lots of push bikes during the AMF years)
     Then pedals got added. Still no gears, or chain. As riders wanted to go faster, the wheel got bigger, as that was the only way to get more speed, and, with that, we got the iconic Penny Farthing.(Also known as Ordinary and High wheeler)

     Eventually the drive wheel was moved from the front to the rear(for safety) and cranks, gears, and a chain popped on to the scene.

     After a time the size of the wheel began to shrink, because now speed could be attained with gearing rather than wheel size.

     Then bicyclists realized they could have two(yes 2) ratios if they put a gear on each side of the wheel, and put wing nuts on the axle, they could turn the wheel around for an easy gear when they got to a hill.

 This led to the creation of the quick release skewer by Tulio Campagnolo. During a race he was unable to get the wing nuts loose to make a gear change, and a flow of creative juices spilled out on to the dusty road.
     Tulio did not stop with the quick release, he went on to develop many improvements to the sport, and today we take a look at one of them, the Cambio Corsa. One of the first derailleur designs, patented in 1933 and in use until the late 40s.
     (This bike is also equipped with an anti-flat device, a wire rubbing against the tire in the hope of popping loose that thumb tack rather than the tube.)

     Cambio has various translations, including gear, rate, change, and transmission. All of them are appropriate to the derailleur. Corsa means race, and this design was primarily used on racing bikes.So good job in the naming department.
     The Cambio Corsa gave the rider four gears and shifting on the fly. There was more of a learning curve compared to the indexed and electronic shifting we have today.
      While pedaling along, you reach back and open the quick release(Something any bike shop will tell you is a bad idea), then you actuated a second lever that moved a gate back and forth to shift the chain from one gear to another. Because this gate was over the top run of chain, you needed to back pedal to get the chain to shift. Back pedaling also allowed the wheel to move forward in the dropouts letting the chain slack enough to make a shift. Once the gear was selected you began pedaling again to move the wheel back in the dropouts and tension the chain. Then you tightened the quick release. (I am guessing there were very few sneaky upshifts before the sprint.)
     If you handed a bike equipped with this set up to a modern rider, it would look like a scene from Scanners.


     You are thinking to your self, "That is absolutely crazy. The wheel would come shooting out of the dropouts or cock sideways and lock up". And you would be right except old Tulio was on the ball and he made an axle with geared ends that fit up to teeth cut in to the drop out. This kept everything square and under control.

     Here is a video of the system in action.

And a link to a better video, This one is better
     And for the car guys, Maserati makes a car called the Cambiocorsa.


     So next time a friend complains about his shifting, or how he does not have enough gears to climb the hill, make him read this page.